Live Streaming Guide
Live streaming is an extremely useful technology, but if you don’t know how the process works getting your content live on the web can be a daunting task. This guide was built with the intent to simplify and explain the live streaming process so you have a clear idea of what you need to start broadcasting content across the web. However, if you would like to talk to someone about how to get your live streaming setup started please do not hesitate to get in contact and one of our friendly staff will be happy to help.
What you will need?
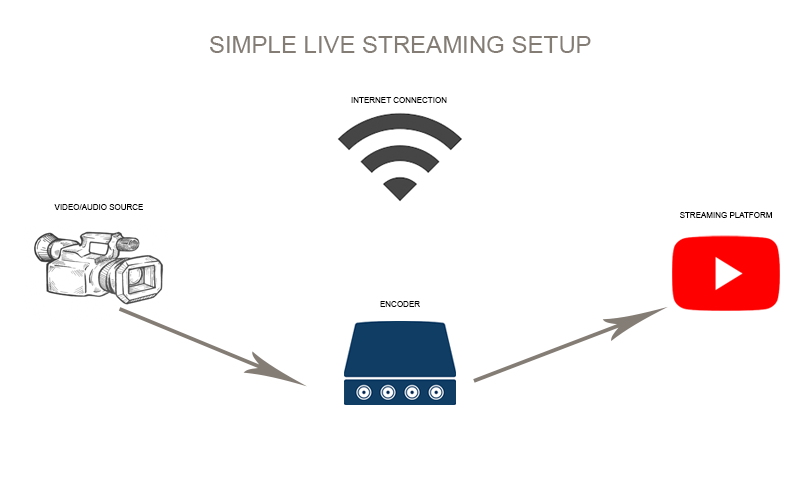
There are 4 essential components you will need to start live streaming these are a video/audio source, a video encoder, a streaming destination and a stable internet connection:
Video/Audio Sources
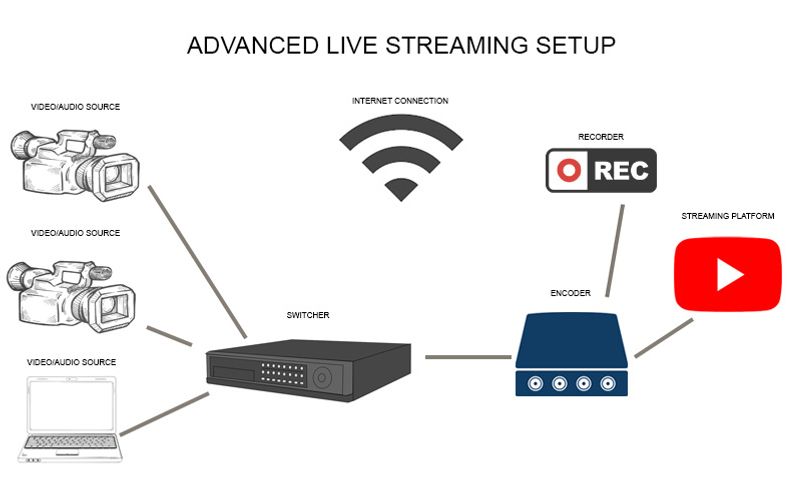
In order to start live streaming content to the internet, you will first need a content source. Source types can be divided into video sources and audio sources. A simple Live streaming set-up will consist of just one video source and one audio source, while more complex ones can be made of 2 or more video and audio sources.
With more complex setups you may require a switcher to control all of your inputs. A switcher allows you to plug in multiple inputs and switch or choose between different audio or video sources. Although the main functionality is for selecting which sources of audio or video are to be output, they are sometimes used for special effects and to ensure smooth transitions between scenes. Some switchers also have built-in hardware encoding, such as the Datavideo iCast 10NDI and Blackmagic ATEM Mini Pro.
>Click here to see Protel's full range of switchers
Main types of Video Sources used for Live Streaming:
Computer screens
Webcams
Main Audio Sources include:
Lapel Microphones
Handheld microphones
USB Microphones
Audio File
>Full range of Protel's microphones can be found here
The most common way to capture audio is to run your microphone signal through your camera, the audio will come embedded in your video source, which means they will arrive together through one cable.
How to Capture Audio/Video Sources
Capturing your audio and video sources is an essential part of the live streaming process. The most common forms of video transfer today is achieved using traditional audio/video cables such as HDMI and SDI, as well as video over IP such as NDI (developed by NewTek, learn more here) and HDBaseT.
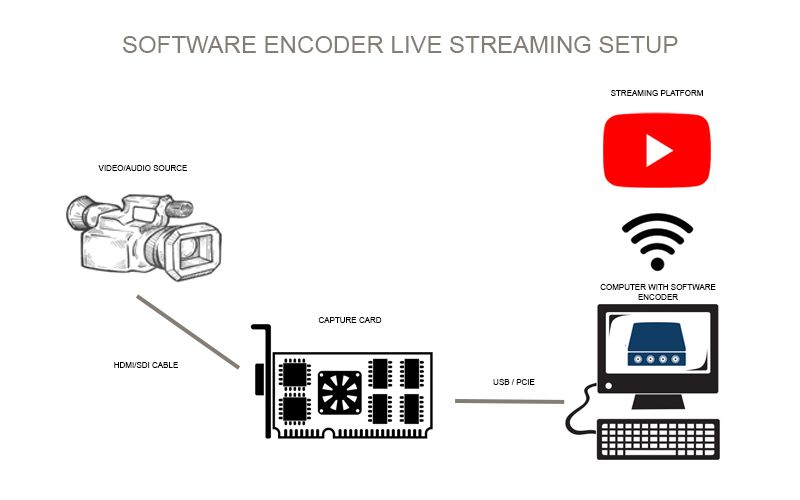
If you are using a software encoder on your computer to create the stream then you do not have the luxury of plugging your camera into your computer using an HDMI or SDI cable. In order for your computer to receive the HDMI/SDI signal a capture card is needed, these can either be as a USB interface or as PCIe cards. Simply connect one end of your HDMI/SDI cable to your camera and the other to your capture card.
NOTE: USB cameras/microphones can be connected directly to your computer with no need for encoding.
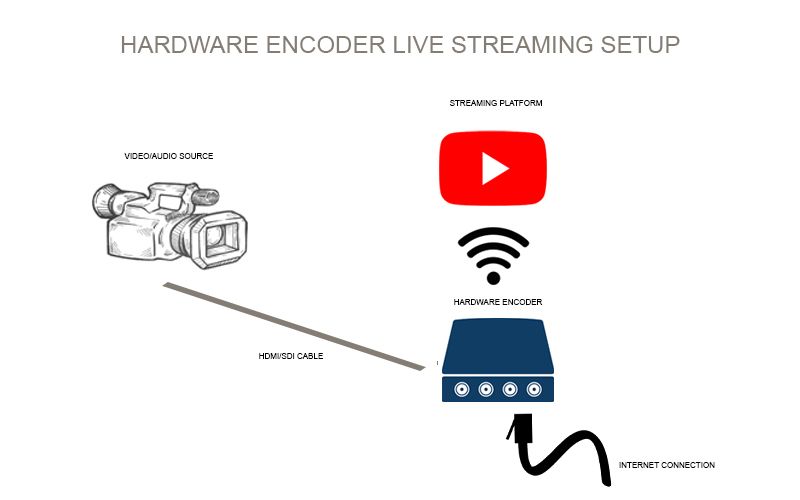
If you are using a hardware encoder you can connect your camera directly as they have capture cards built into them.
Video Encoders
Simply put an encoder translates the signal from your camera to a format that can be streamed live to the internet. This is necessary as the normal output format of your camera's video contains far too much data to create a stream that can be uploaded to the internet.
There are two different types of encoders we will be looking at:
- Software Encoders
- Hardware Encoders
Software Encoders
Software Encoders as mentioned previously require a capture card in order for your computer to receive an HDMI/SDI signal. Once you have a capture card you will need to install encoding software on your computer. Wirecast, vMix, Streamlabs OBS and the ever-popular OBS Studio are just a few of the software options for encoding your content. OBS Studio is a good way to start learning about encoding because it’s free to download and install, all settings are easily accessible, and there are many online tutorials to help you along.
The most important thing to know about using software encoders is that your computer is providing the processing power for the encoding. This means that your computer will need to be able to dedicate large amounts of CPU usage to this process. If your computer is not powerful enough your live stream may be compromised.
Protel offers a wide range of capture cards so you can easily connect your video/audio sources to your computer. If you are unsure which encoder is best for your application please contact us.
Popular capture cards:
Blackmagic DeckLink Mini Recorder 4K
Hardware Encoders
Hardware encoders offer a more reliable, flexible and convenient stream as they are specifically designed for Livestreaming and do not require CPU from your computer. Modern-day hardware encoders have multiple video inputs meaning no capture card is required. All the encoding is done within the unit which means your computer performance is not compromised whilst using this method. Hardware encoders need to be connected directly to a network via ethernet or wifi in order to stream.
One of the more popular solutions at Protel is the Blackmagic Web Presenter - This unit works in a similar way to a capture card but does not need a software encoder to work. The Web Presenter converts the video signal to high quality, low data rate 1080p signal. It then sends this to the computer over USB. Doing so means that it is able to be picked up as a webcam by your PC. This means no encoding is needed to be done as the computer can live stream directly from this kind of input.
Protel sells some of the best hardware encoder options available today, these can be found below. Naturally, each encoder is unique given its inputs and configuration. If you are unsure which Encoder is best for your application please get in contact.
Popular hardware encoders:
Live Streaming platforms
Live streaming platforms, also known as content delivery networks (CDN’s), are the site/program you use to make your live stream available to your audience. There are both free and paid platforms. The most popular of which are:
|
Paid |
Free |
|
Vimeo |
Youtube |
|
Dacast |
|
|
Streamshark |
Twitch |
Both free and paid streaming platforms will require you to sign up to their site and sign in to start your stream. Each streaming platform is unique in terms of its functionality and the audiences that use it. For example, Twitch is mainly used for gaming whilst Facebook is better used for community-targeted content.
Stable Internet Connection
It should go without saying that in order to live stream to the internet you need to ensure you have a stable and strong internet connection. Ethernet (wired) connections create the most steady connection and hence are favourable to set-up if possible. It also pays to check your internet speed using online tools such as https://www.speedtest.net/ - by knowing your upload bandwidth you will be able to determine at what bit rates you can stream at.
Setting up your Live-Streaming system
Step 1. - Connect your video source to your encoder. Ensuring that everything is turned on and receiving power where necessary.
Step 2. - Configure your encoder. Adjust your encoder settings to match the output you desire. Resolution, frame rate and bitrate are common settings that may need to be changed. If you are using a software encoder these settings should be in the encoding software you are using. For hardware encoders, you may need to connect to your encoder on a device through your network or through a USB connection to access its settings.
Step 3. - Configure your CDN. Sign in to your chosen CDN and configure your live stream settings - For example - stream description, privacy settings, etc.
Step 4. - Connect CDN with Encoder.
To get streaming your encoder and CDN must be connected. This is because the CDN needs to know where to receive your content from. The CDN and encoder are linked together using a Stream name or Stream key. The Stream Key is provided by your CDN (usually found in advanced settings) simply paste it into your encoder's encoder user interface.
Step 5. - Press the stream button on your encoder to begin live streaming your content to the internet.
Conclusion
Hopefully, with the above guide, you will have a clearer idea of how live streaming works and what is needed to get your content live on the internet. Here at Protel, we sell everything you need to build your very own live streaming setup. We source from only the best in live streaming so you can trust you will have a reliable and robust live streaming setup. Our products can be found in our store but if you would like further assistance with building a live streaming setup please do not hesitate to contact us.